Quick Start
After installation, there are three modes of using yt-napari:
Additional quick start topics include:
Configuring some
yt-naparibehavior between napari sessions: see Configuring yt-napari.Loading sample data: see Loading sample data.
jupyter notebook interaction
yt-napari provides a helper class, yt_napari.viewer.Scene that assists in properly aligning new yt selections in the napari viewer when working in a Jupyter notebook.
import napari
import yt
from yt_napari.viewer import Scene
from napari.utils import nbscreenshot

viewer = napari.Viewer()
ds = yt.load("IsolatedGalaxy/galaxy0030/galaxy0030")
yt_scene = Scene()

left_edge = ds.domain_center - ds.arr([40, 40, 40], 'kpc')
right_edge = ds.domain_center + ds.arr([40, 40, 40], 'kpc')
res = (600, 600, 600)

yt_scene.add_region(viewer,
                    ds,
                    ("enzo", "Temperature"),
                    left_edge = left_edge,
                    right_edge = right_edge,
                    resolution = res)

yt_scene.add_region(viewer,
                    ds,
                    ("enzo", "Density"),
                    left_edge = left_edge,
                    right_edge = right_edge,
                    resolution = res)
yt_scene.add_region accepts any of the keyword arguments allowed by viewer.add_image.
See yt_napari.viewer.Scene() for all available methods and the example notebooks for further examples.
loading a json file from the napari gui
yt-napari also provides the ability to load json directive files from the napari GUI as you would load any image file (File->Open). The json file describes the selection process for a dataset as described by a json-schema. The following json file results in similar layers as the above notebook example
{"$schema": "https://yt-napari.readthedocs.io/en/latest/_static/yt-napari_latest.json",
 "datasets": [{"filename": "IsolatedGalaxy/galaxy0030/galaxy0030",
               "selections": {"regions": [{
                              "fields": [{"field_name": "Temperature", "field_type": "enzo", "take_log": true},
                                         {"field_name": "Density", "field_type": "enzo", "take_log": true}],
                             "left_edge": {"value": [460.0, 460.0, 460.0], "unit": "kpc"},
                             "right_edge": {"value": [560.0, 560.0, 560.0], "unit": "kpc"},
                             "resolution": [600, 600, 600]
                          }]}
         }]
}
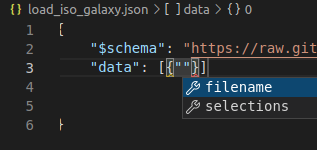
Note that when live-editing the json in a development environment like vscode, you will get hints to help in filling out a json file. For example, in vscode, you will see field suggestions after specifying the yt-napari schema:
napari widget plugins
In addition to the reader-plugin mentioned above, yt-napari includes a napari dock widget for loading in data selections from yt. If you have ideas for additional plugins, definitely reach out!
The yt-napari yt Reader:
The use the yt Reader plugin, from a Napari viewer, select “Plugins -> yt-napari: yt Reader”. Enter or select a file to load, fill out the remaining items to select a field and extent of the spatial selection, then hit load. yt-napari will then load the dataset, sample it and return a new napari image layer.
The reader plugin does its best to align new selections of data with existing yt-napari image layers and should be able to properly align selections from different yt datasets (please submit a bug report if it fails!).
The yt-napari yt Time Series Reader:
This reader will apply a spatial selection to a set of files, similar to working with a yt DataSeries object. You specify the spatial selections and a list of files or file pattern to match. Note that while the operation is in a non-blocking thread, if your simulation data is large it may take a few minutes to load in your selections. Also note that 3D region selections can easily exceed available memory if you’re not careful… for improving load times and working with bigger-than-memory arrays, you can instead use the jupyter notebook interface for napari with the yt_napari.timeseries module of helper functions to distribute the timestep selections using dask. See the example notebooks for usage.
Saving a selection:
For both the yt Reader and Time Series Reader, you can save your selection configuration to a JSON file by clicking “Save Selection”. This will save a yt-napari JSON file that you can later re-load (see loading a json file from the napari gui).
The yt-napari Metadata explorer:
The Metadata explorer widget will display some basic information about a selected yt dataset including available fields and domain extent.
Configuring yt-napari
User options can be saved between napari sessions by adding to the base yt configuration
file, yt.toml. yt looks for the configuration file in a number of places (check
out the yt documentation
on configuration ). To add
yt-napari options, open up (or create) the configuration file and add a
[yt_napari] section. An example configuration file might look like:
[yt]
log_level = 1
test_data_dir = "/path/to/yt_data"

[yt_napari]
in_memory_cache = true
Configuration options
The following options are available:
in_memory_cache,bool(defaulttrue). Whentrue,
the widget and json-readers will store references to yt datasets in an in-memory cache. Subsequent loads of the same dataset will then use the available dataset handle. This behavior can also be manually controlled in the widget and json options – changing it in the configuration will simply change the default value.
Note that boolean values in toml files start with lowercase: true and
false (instead of True and False).
Loading sample data
A full install of yt-napari (pip install yt-napari[full]) will
allow you to load a selection of the
yt sample datasets from the napari GUI.
Note that some of the sample datasets are large (multiple GBs) and the first time that you try to load a dataset you’ll have to wait for the datafile to download.
